
This tutorial is for NVR Wireless Security Camera System using IP PRO, EseeCloud, vr cam
Safety Caution
- Please do not put any fluid container on the product.
- Please use the product in ventilated environment and prevent blocking the vents.
- Please use included power supply with the product to prevent damage to the product.
- Please use the product under its standard working temperature and humidity.
- Dust on PCB may cause short circuit.It is suggested to clean the dust on PCB timely to make the product work properly.
- Please obey the regulation and policy in your country and area during the installation of this
All PRODUCTS & PARTSThis product may require cabling,we suggest to test all products&parts before installation and cabling×Dismiss this alert.
Nvr product description
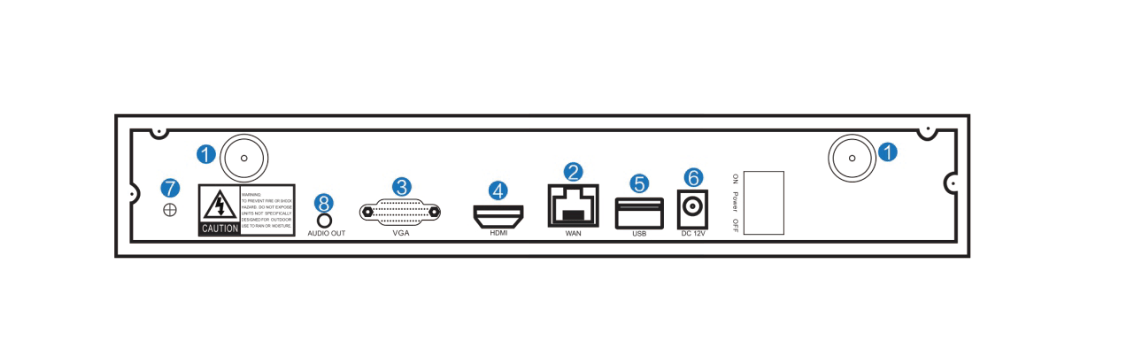
1. WIFI Antenna Ports:Double antennas to WIFI range
2. WAN Port:Connect your NVR to Internet
3. VGA Port:For viewing on VGA monitor
4. HDMI Port:For viewing on HDTV
5. USB Ports:For mouse and backup
6. Power Input
IP Cameras product description
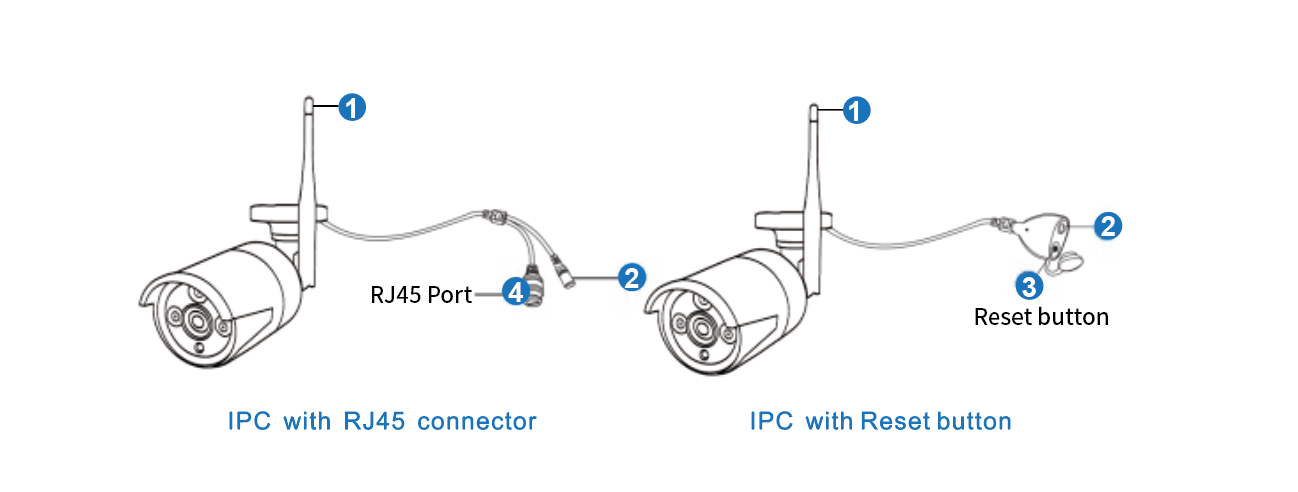
①. WiFi antenna:WiFi connection with NVR;
②. DC Port:input power 12V 1A;
③. Reset Button:press reset button for 10 seconds to restore factory setting and enter into matching-code mode;
④. RJ45 Port:for pair the camera with NVR,or connect the camera by wired connection
Note:Working temperature ranging from -13 degrees Fahrenheit to 122 degrees Fahrenheit.
Installation Instruction of WIFI NVR KIT
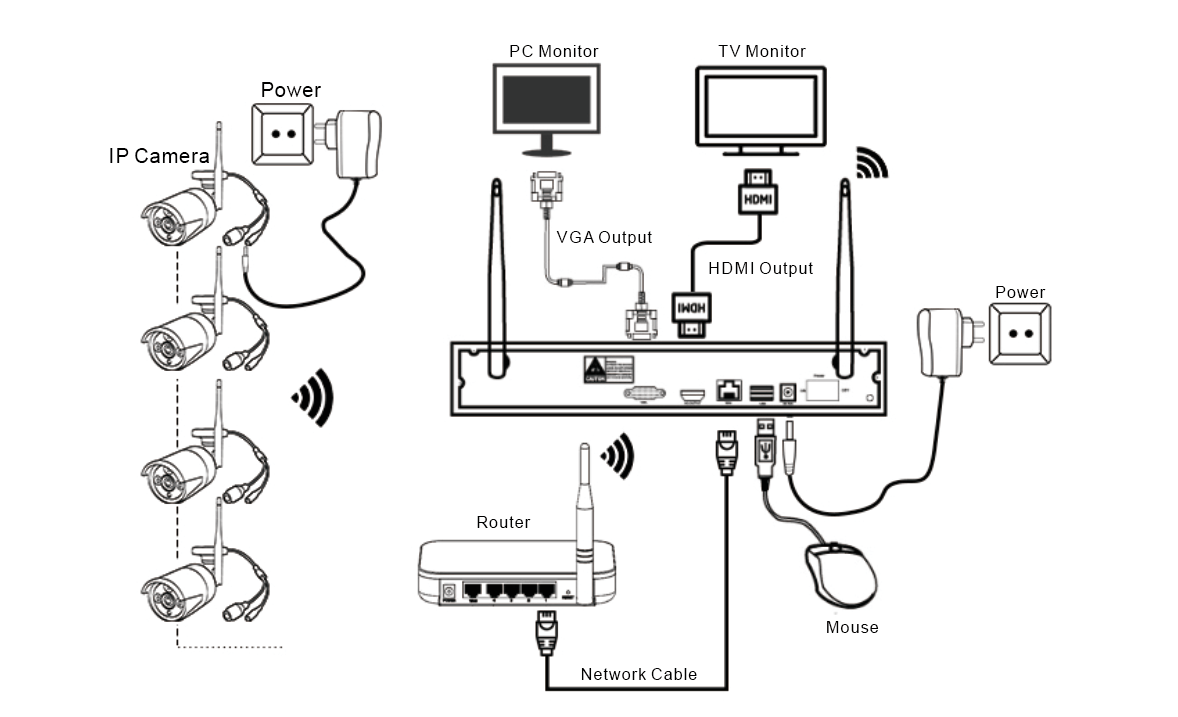
- Install antennas for cameras;
- Connect a screen to the NVR via its HDMI or VGA port(HDMI cables is included for no monitor NVR);
- Plug the NVR to power(use bigger 12V 2A power adapter);
- Plug cameras to power(use smaller 12V 1A power adapters);
- Within seconds, you should see cameras’ images on the screen;
- Plug the mouse(included) to an USB port on back of NVR.Then you can login in the system.
- In the OS you can find fullest functionalities including live view,record,playbackvideo backup and all settings
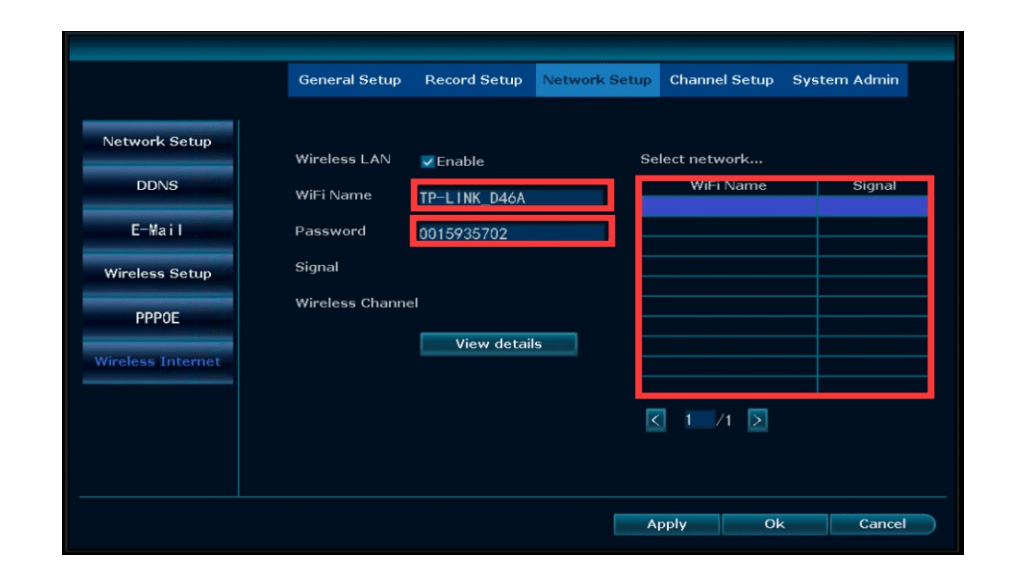
Note:The NVR can work with the router by wireless connection and wired connection Wired connection: when your NVR connect by RJ45 to your router,it will get network settings automatically Wireless connection: right click your NVR mouse and choose System Setup→Network Setup→Wireless Internet→Enable the Wireless LAN→find your own wifi network,and put wifi password here (pls notes it doesn’t work with 5G WIFI network)×Dismiss this alert.
Setup The System
This system is standalone with embedded Linux Operating System in the NVR. Just like a desktop PC, need to hook a screen to the NVR to enter the OS .Any TV,monitor with VGA or HDMI input should work for it.
If you connect the NVR with monitor shows Hiseeu logo or shows black,normally it is your monitor resolution is lower then the NVR.You can press the left side of the mouse for 30s,then it will reboot.
If still can’t work,pls change a monitor,thanks.
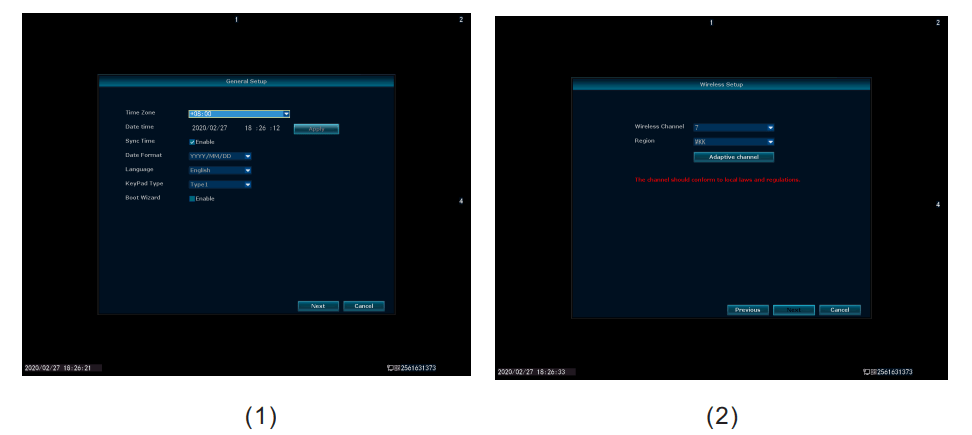
When you turn on the NVR box, the monitor will get below interface: Setup Wizard- -Down- -General setup- -Next -wireless setup- -Next- -Fast network- -Next -Format the hard drive- -Next
CHECK NVR NETWORK , CHANGE NVR SYSTEM LOGIN PASSWORD
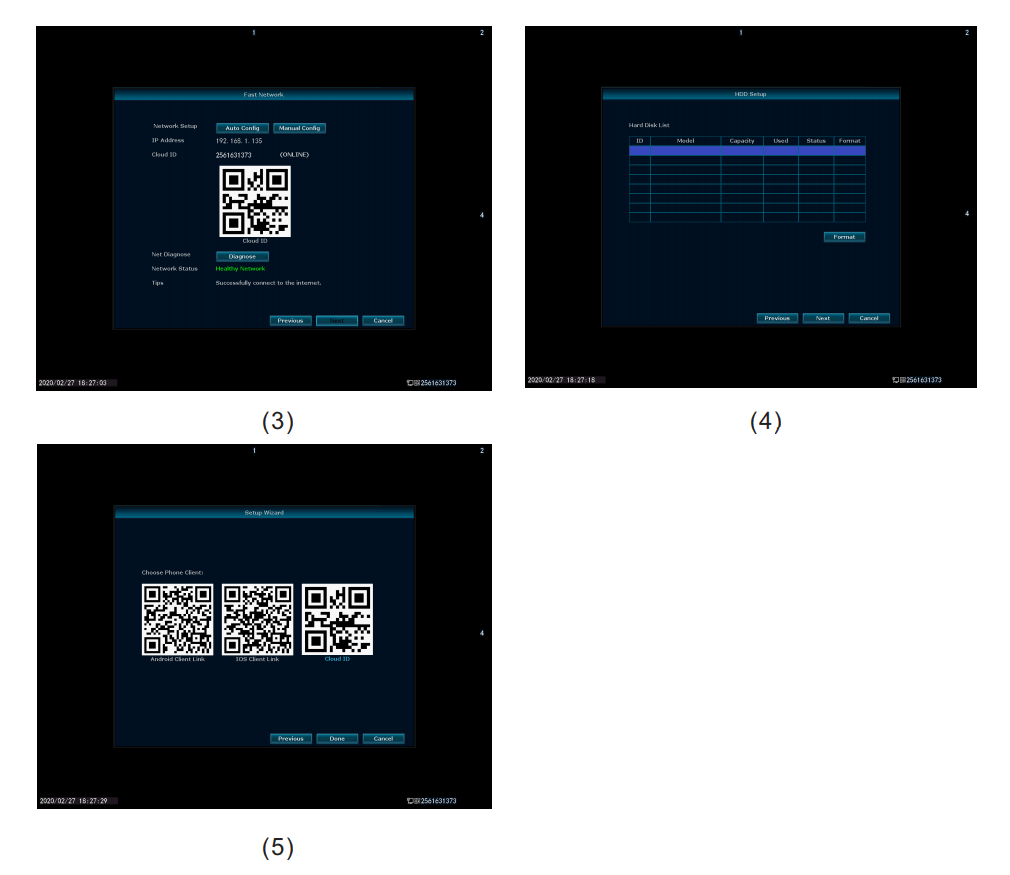
Once you have completed connecting the NVR,wait approximately 2-3 minutes.Next you will see the window below on your monitor screen.For your first time to login in,User name is admin,there is no password,just choose ok to get into the menu.
(if you forget the password,pls find the solution on the FAQ page)
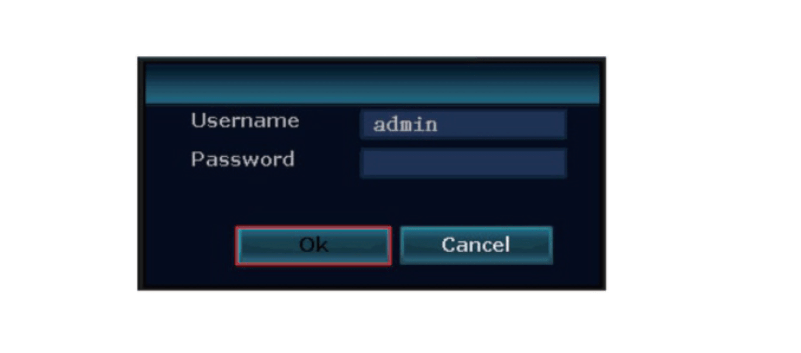
Tips: To protect your privacy,please set your password at earliest convenience(don’t set the password over 8 characters).Right click the mouse→System Setup→System Admin→User to set password.
How to check if your Cloud is online and Network status is healthy ?
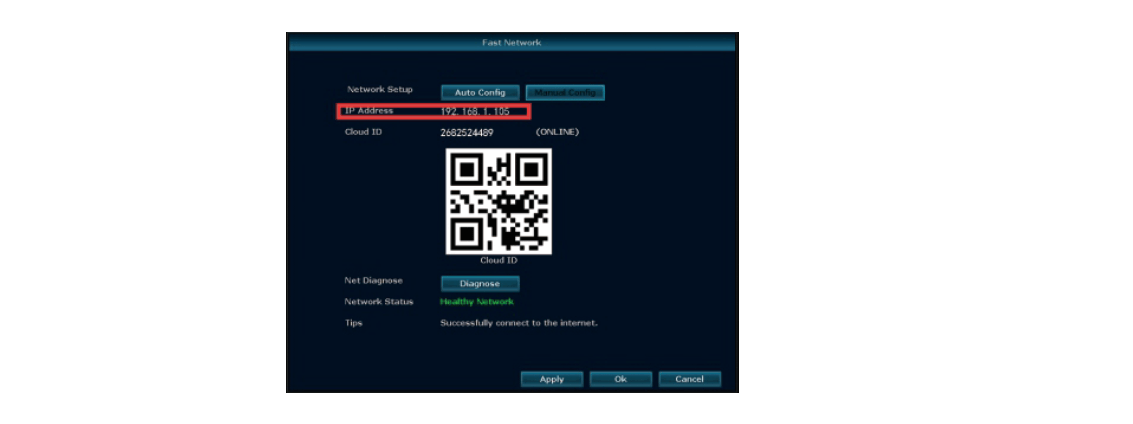
Right click the mouse of the register,choose Fast Network.In the middle of the window you should see Cloud status as ONLINE and Network Status as Healthy Network.
If this does not appear, select Manual Config then enable DHCP,Click Apply,then power off the NVR box,wait a few seconds and power up.
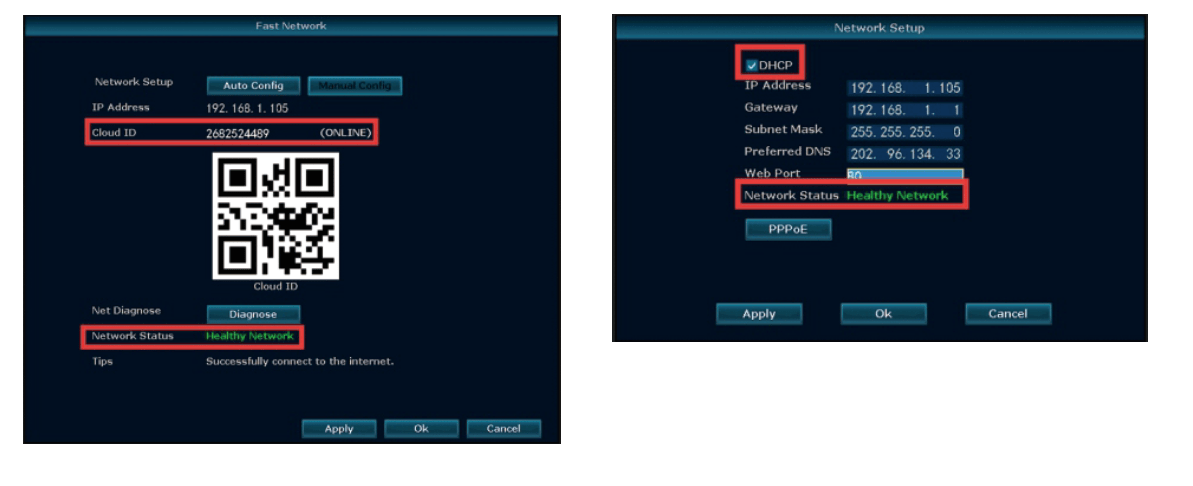
Once you power up, repeat the steps outlined as above.Cloud status must be ONLINE and Network Status must be Healthy Network.If this does not happen,you will not be able to view remotely
Menu Do What
Menu bar
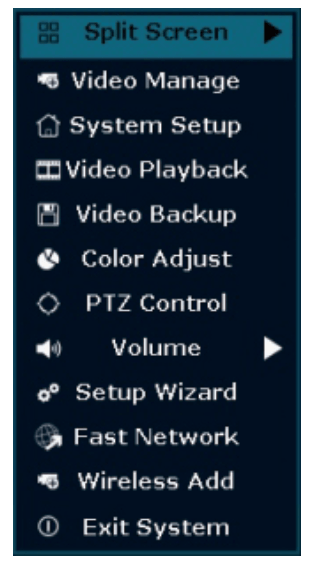
Split Screen: change status of live view.You can choose to view multiple cameras or any single camera.
Video Manage: manage IP cameras and NVR channels.
System Setup: all system settings.
Video Playback: playback recorded videos.
Video Backup: backup recorded videos.
Color Adjust: adjust the image setting of the each camera
PTZ Control: control PTZ camera
Volume: Adjust volume of audio cameras(works only for audio cameras).
Setup Wizard: step by step guide of 1st time general settings.
Fast Network: shortcut to network settings.
Wireless Add: add IP cameras into NVR channels wirelessly.
Exit System: logout,reboot,close screen output and shut down the system.
System Setup
Click right button→Choose System setup; enter the menu that enables you to do all settings related to this system.
- General setup(This enables you to set)
Language,Display Resolution,Time,HDD informaion,Error - Network setup(This enables you to set)
All network related settings - Channel setup(This enables you to set)
Manage channels and cameras - System admin(This enables you to set)
System version,System maintenance including system upgrade,User and password management,Restore to default settings - Record setup(This enables you to set)
Record plan for each channel video,detection
Menu Do What
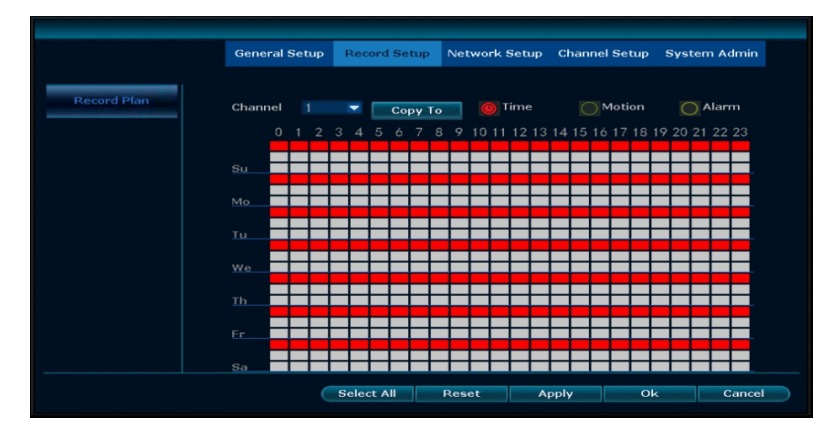
There are 3 modes for reocrd.
- Time Recording: Setup period of time of recording on NVR GUI.Right click mouse→System Setup→Record setup→Record Plan.Click “time”and put mouse icon on the upper left corner(for example“1”as picture shows),press and drag the mouse to the right to choose the time.The list will turn to red.
- Motion Recording: Only detect motion and then start recording.Right click mouse→System Setup→Record setup→Record Plan.Click“motion”and put mouse icon on the upper left corner,press and drag the mouse to the right to choose the time.The list will turn to green.
- Alarm recording: Right click mouse→System Setup→Record setup→Record Plan.Click “Alarm” and put mouse icon on the upper left corner,press and drag the mouse to the right to choose the time.
The list will turn to yellow.
Note: Users can setup any period of time they want,for example 0:00:00-23:59:59,That’s 24 hours×7days recording.When NVR detects hard disk,the default setting will be 24 hours×7 days recording.
The priority of Alarm is higher than that of Motion,and the priority of Motion is higher than that of Time.
Video Playback
Steps: right clik mouse in main menu→Video playback→choose date,channel,record mode→click search→then can view playback file.(IE browser can’t check the playback directly,so you can use the Eseecloud software on computer or check on your phone app Eseecloud and IP RPO)
Warm prompt:
- IIIustration for playback button:
 play,
play,  pause,
 fast forward×2,×4,×8
 - Play file:Choose the recording file in file list,as number “1” shown in picture.Choose one of the recording,click “play” to play to recording file;
- Video backup:Choose the recording file in file list,as number “1” shown in picture.Insert the U flash disk,click “video backup” to backup the file;
- Timeline: Click “date”and “time”at left bottom to check the timeline of recording,as number “2″ shown in picture;
- On the timeline with recording file,left click the mouse,the can playback the file.
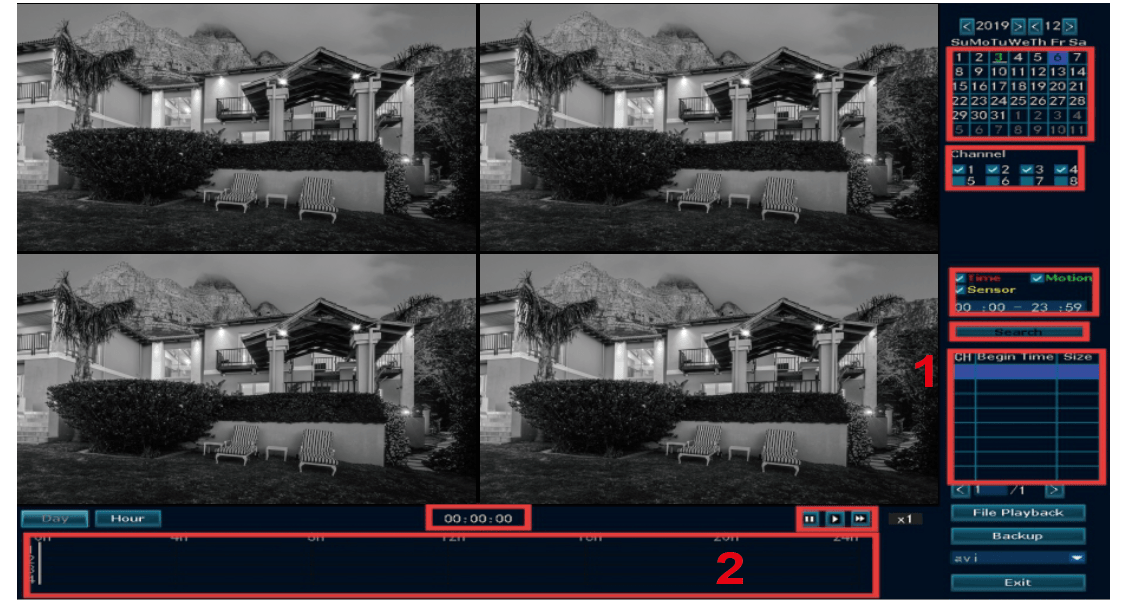
Notes: you can see four channel cameras playback at the same time,if you want to check other channels you need select the correct channel at first,then choose search to find it playback.
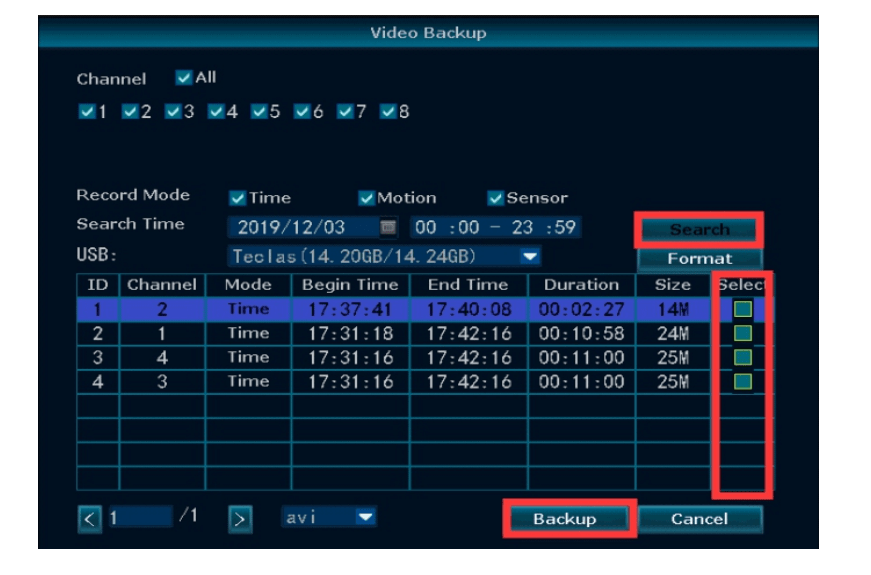
How to Backup the video
Use U disk to copy video,so easy and convenient!
- 2 USB ports: Plug U flash disk into the USB port of NVR. Right click on main menu→Video backup→choose backup channel→choose video mode→setup searching time→search→choose recording file on the list→video backup (support 32G U flash disk at max.Recording file is packed one hour per time.)
- 1 USB port: Right click on main menu→video backup→choose backup channel→choose video mode→setup searching time→search→choose recording file on the list→video backup, insert U flash disk within reminding 1 minute,then the system will backup recording file to U flash disk.
The playback files is avi. format, you can use VLC player to check it on your computer VLC player.
download link: https://www.videolan.org
View on PC via lE or Eseecloud and Phone APP Eseecloud or IP PRO
To View on the the PC
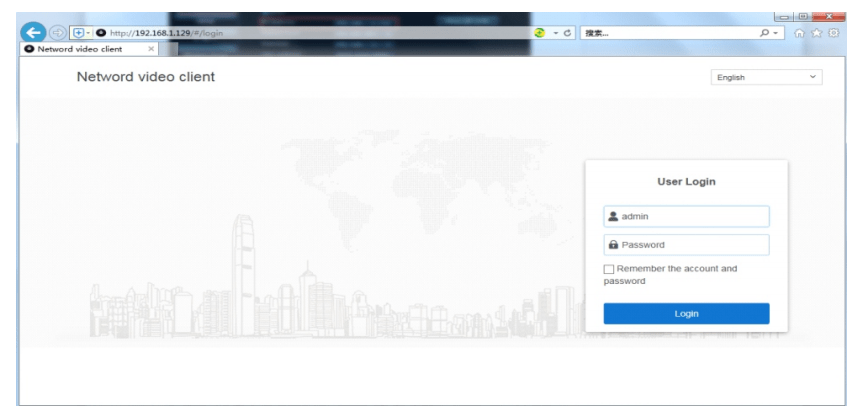
To view on browser,you have to connect the NVR and your computer to the same router.Enter the IP address of NVR on the browser’s address bar.(We recommend using IE or Micorosoft Edge) Right click the mouse→system setup→Network Setup→IP address (Start with 192.168… )
You can change language on the right top corner.

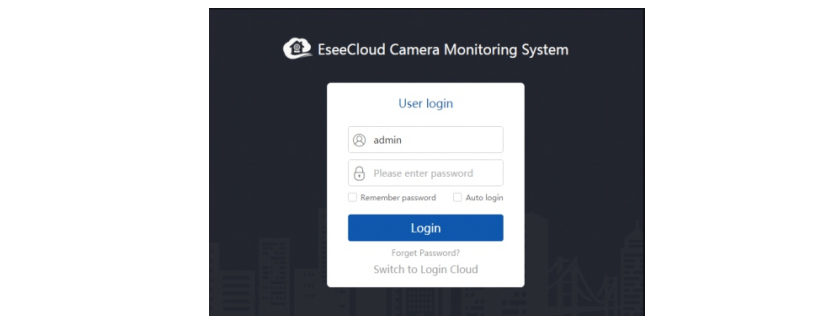
To view on Eseecloud software on PC
Input Cloud ID (Right click the mouse→fast network→Cloud ID)
Input User Name and Password (If you doesn’t change the user name and password,User Name is admin ,no password)
please download Eseecloud software from: https://ipproapp.com/computer
user name is admin,no password,choose login
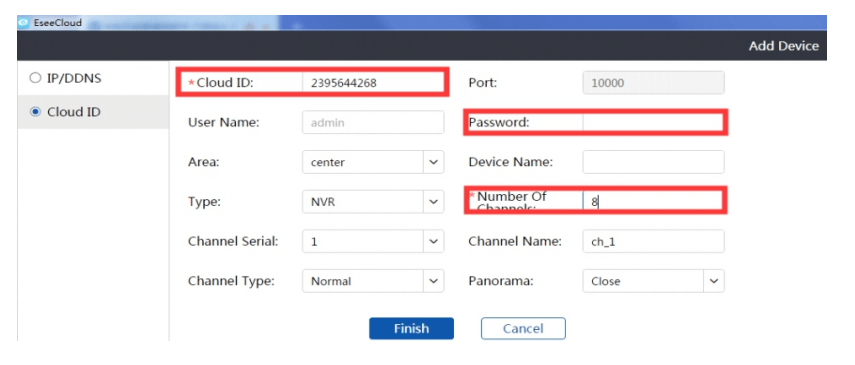
*Select “Add”
*Select “Cloud ID”.enter the cloud ID(9 or 10 numbers).You can find it on your home monitor screen.
Or right click the mouse, choose Fast network find cloud ID here
* Username is NVR system user name on your home monitor screen
* Password is your NVR system password on your home monitor screen.(If you don’t change It in your setup,it should be no password)
* Channels: Input 4 or 6 or 8. If you have 4 cameras,enter 4 etc.
* Click Confirm and you will see the video.
if you check in the local network,you can use the NVR IP address to add the system (Find the IP address on Fast network page or Network setting page)
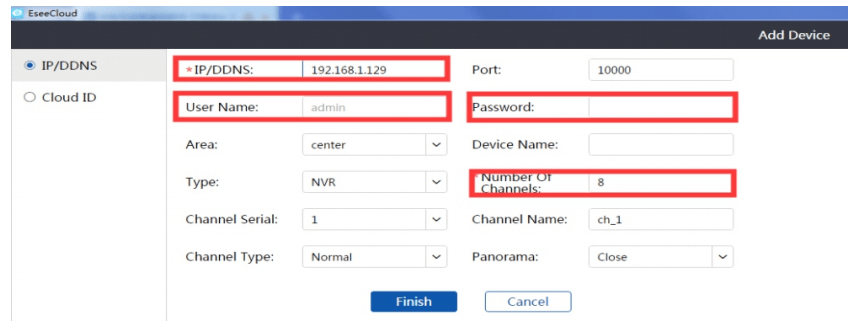
To View on IE browser
Find the IP address: right click your mouse and choose Fast network, you will see the IP address here.
Enter the NVR’s IP address in your IE browser for example: http://192.168.1.105(If the default WEB port 80 has been changed e.g. to 100,you need to add new port number when input IP address in the browser,for example: http://192.168.1.105:100).
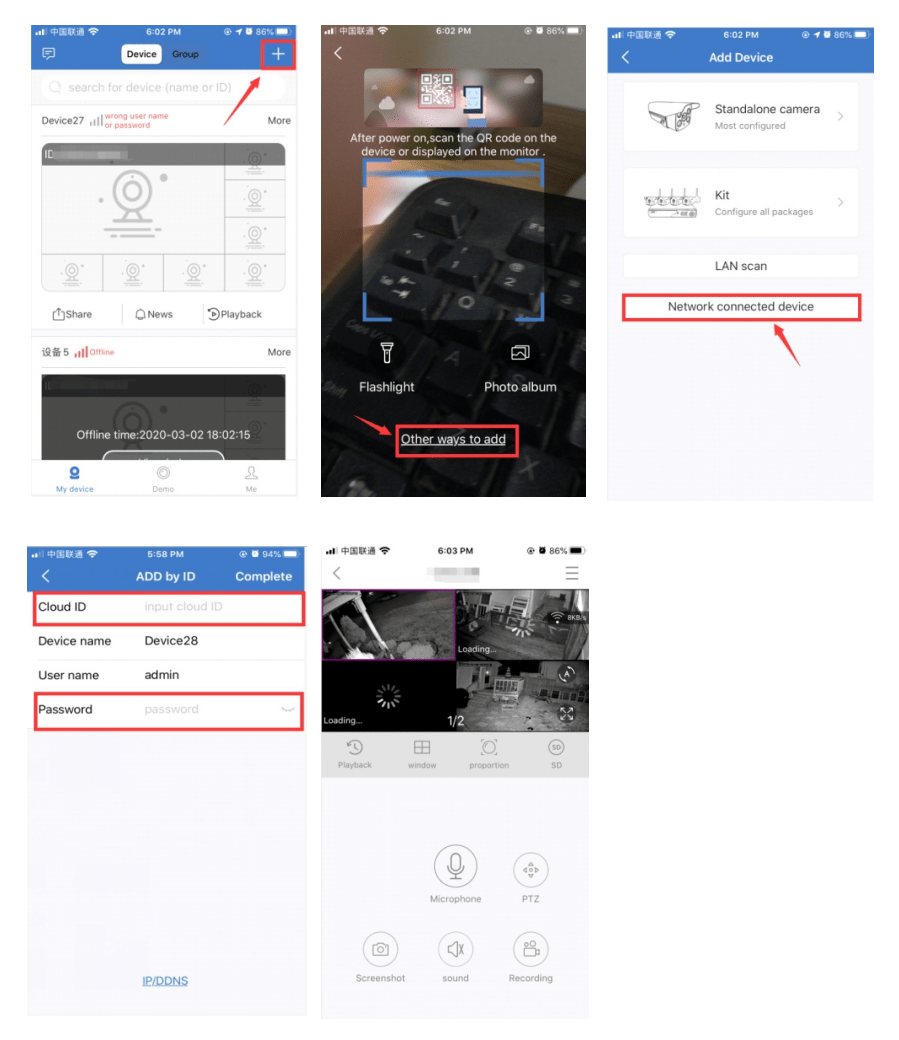
To view on the Phone
Users can use cellphone to scan the QR code below to install the APP free of charge,or users can search “Eseecloud”or ’IP PRO‘ on APP store or Google Play then install the APP.

Click “+”→other ways to add/ scan the QR code on your fast network page→Network connected device→input Cloud ID and User name and password (user name and password is the same one you login in NVR)
Tips: if you’ve set a password on your NVR system,please update your password on APP to view.
And if your camera loading for a long time and don’t show image,you can right click your NVR mouse and choose System Setup→Network setup,change the MTU to 1000.
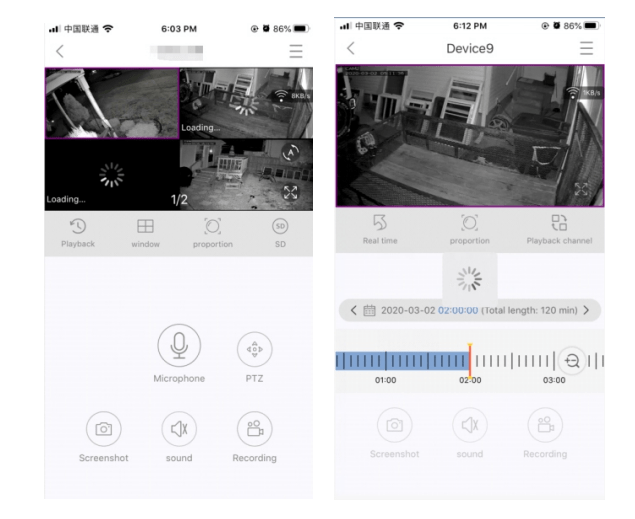
Playback On Mobiles
In the Eseecloud APP,while viewing live video of the system,click Playback,you will enter the remote playback menu.The APP Playback only check one channel at one time
Tips: Videos in playback are HD mode for real time which requires very good transmission condition.
We suggest to playback in LAN.Remote playback out of LAN may not 100% work due to connection & network condition.
Extend WIFI Range
Wireless connection is easy and convenient, but it’s not universal application. Because of the character of WIFI, the WIFI signal will decrease when going through some obstacles Some methods can be applied to bypass obstacles and extend WiFi range.
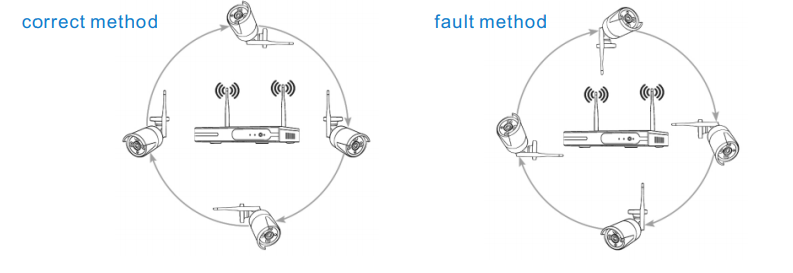
Position The Antenna Correctly
WIFI range is like an apple and the antenna of NVR is in the center of it.WIFI signal is strong all around the WIFI range.Antenna of NVR should be put straight up,if not,WIFI signal will be weak.
According to the signal transmission character of antenna, the antenna of cameras should overlap or parallel to NVR WIFI range,as pictures showed below:
Use Antenna Extension Cord to prolong WIFI distance
Installation method of antenna extension cord
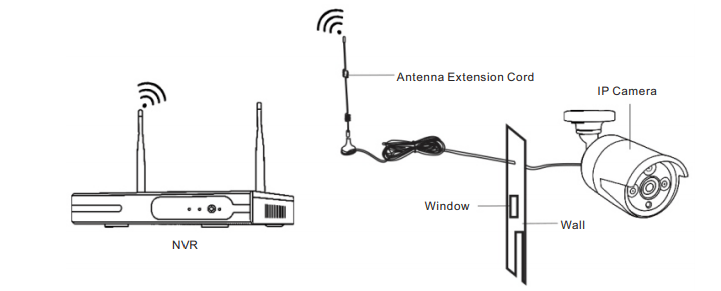
Note:When WIFI signal is not strong enough against walls,users can take off the original antenna and subtitute antenna extension cord.Drill a hole on the wall to let the extension cord go through and simply it where WIFI signal is strong.
Set up cascading connection in a reasonable solution,extend wifi signal transfer distance
Note:
Repeater function can’t strengthen WIFI signal for wireless NVR kit, but can extend the distance by repeaters→WIFI cameras.
Only when the repeater cameras and repeated cameras are positioned correctly,WIFI distance will be extended.
Repeater function and 3 meters antenna extension cord are two methods to extend WIFI range.
Users can choose one according to real situation.
Repeater Setup
Step 1. Right click the NVR mouse,and choose “Video Manage”- -then left click Repeater”
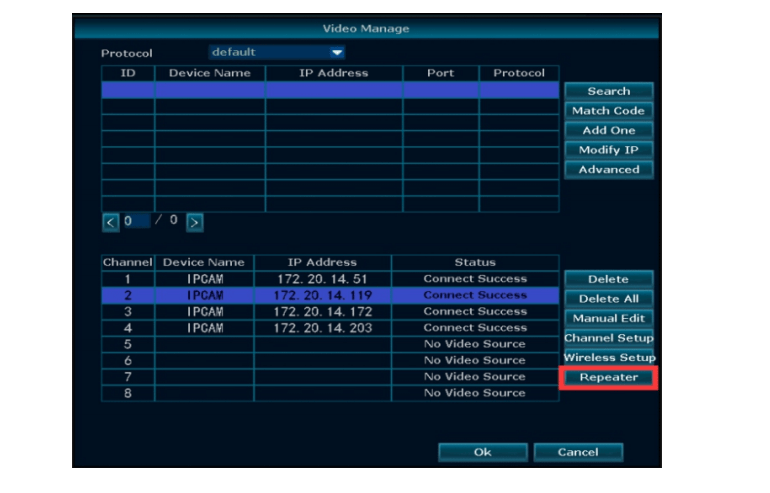
Step 2. Add repeater
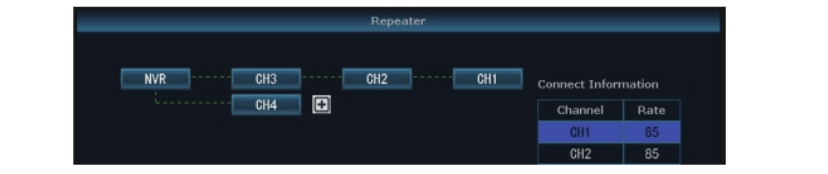
As picture shown below,click icon + besides channel 3,choose other channel.
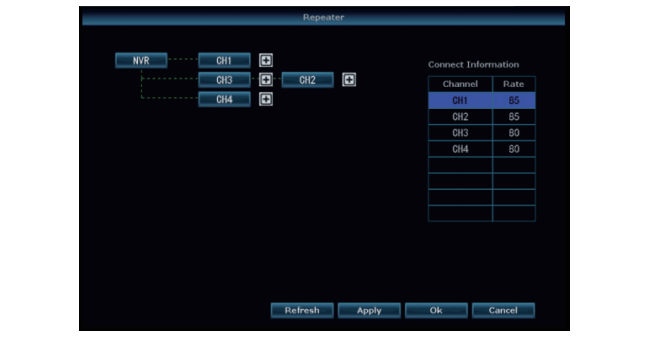
Step 3. As picture shown below, it means IPC1 is connected to NVR through IPC2 and IPC3.
IPC2 is connected to NVR through IPC3.IPC3 is connected to NVR directly.
Step 4. Click “Apply” and then click “refresh” to check if the setting is successful.
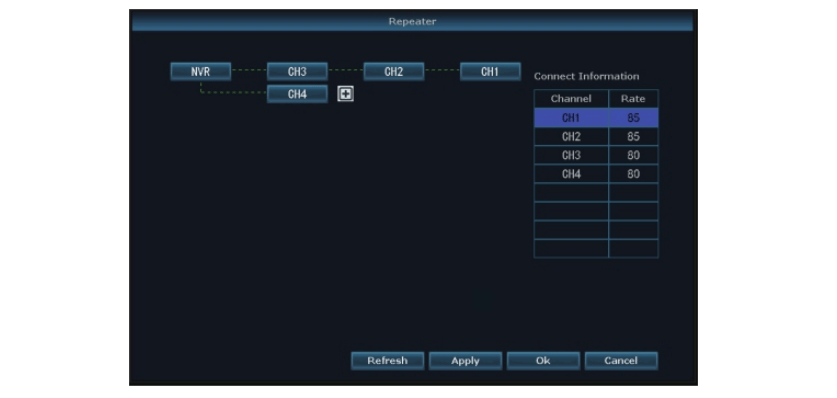
Delete Repeater
Move the mouse to targeted channels,left click to delete,and then click “Apply” and “OK”.
Application Example
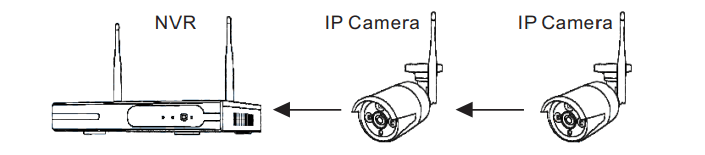
As picture shown above, when IPCAM1 is put somewhere is out of NVR WIFI range,and there is IPCAM2 between them with strong WIFI signal,users can put IPCAM1 close to NVR and power it, setup IPCAM1 repeated by IPCAM2, and then install IPCAM1 to the presupposed place.